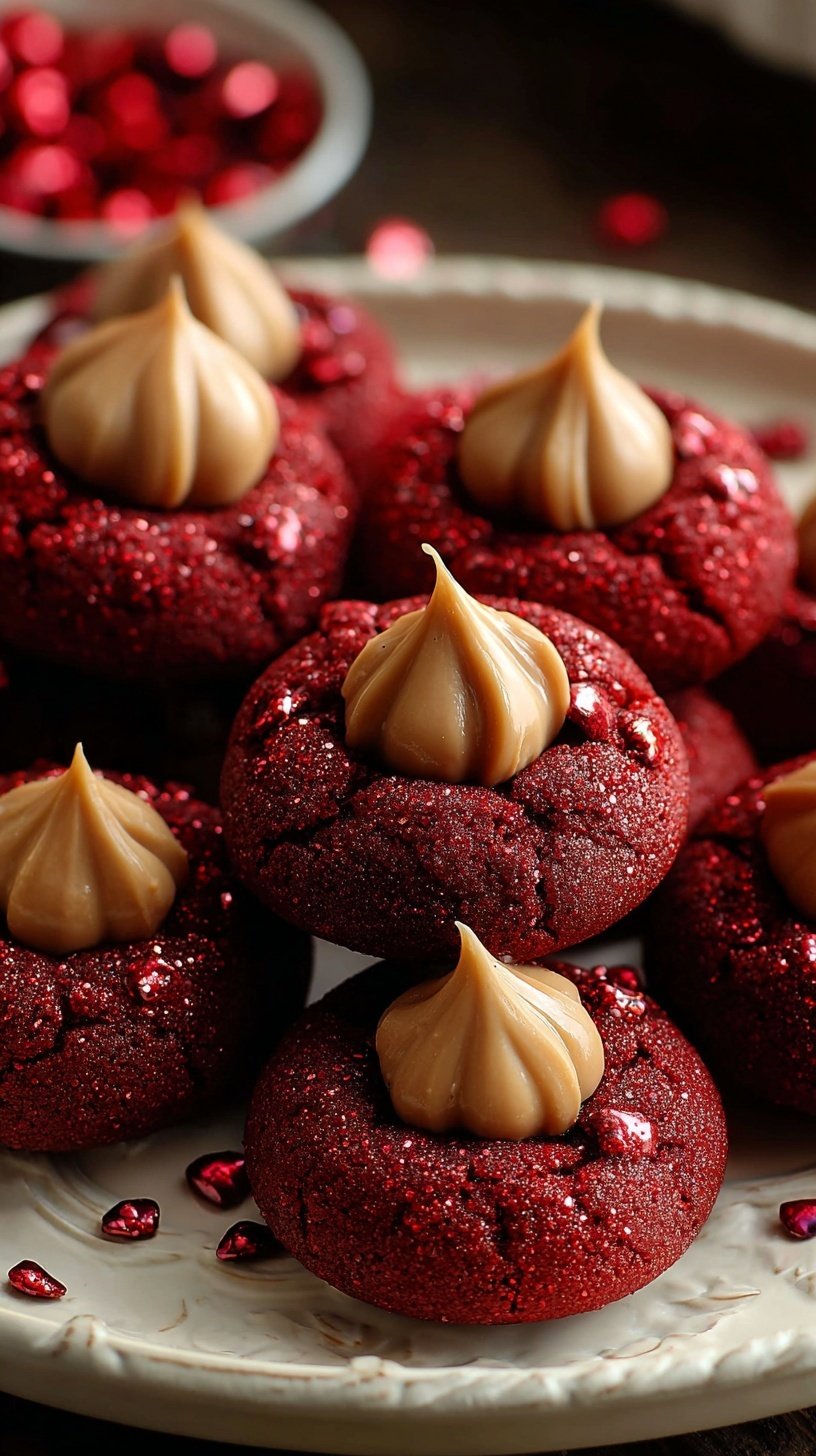
Looking for a dish that wows your guests without stressing you out? These Red Velvet Peanut Butter Blossoms are the ultimate winter treat. They bring a vibrant pop of color to every dessert spread. You will love how the rich cocoa flavor pairs with creamy peanut butter. It is the perfect recipe for a cozy snow day inside.
The holiday season is always a busy time for families. You need a recipe that is quick and impressive. These cookies look like they came from a fancy bakery. However, they are simple enough for a beginner to master. Your kitchen will smell amazing as these bake in the oven. Get ready for these to become a new family tradition.
Why This Recipe Is a Winner
This recipe is a total showstopper for your next holiday cookie exchange. It takes the classic blossom cookie and gives it a festive upgrade. The dough is soft and tender with a hint of chocolate. It is budget-friendly and uses simple staples from your pantry. Your family will reach for these again and again all season long.
One of the best parts is the striking red color. It looks beautiful next to green holiday decorations. These cookies are also kid-approved and fun to assemble. Children love unwrapping the chocolate kisses and pressing them down. It is a great way to make memories in the kitchen. You get maximum flavor with very little effort or mess.
Simple Cooking Method
You will love how easily this dough comes together. Even if you have never made blossoms, you can do this. The process is straightforward and very beginner-friendly. You start by mixing your dry and wet ingredients separately. Then, you combine them to create a vibrant red dough. Rolling the balls in sugar adds a lovely sparkle.
The baking time is very short at just ten minutes. This means you can bake several batches quickly. The magic happens right when they come out of the oven. You press the chocolate kiss into the warm, soft center. This creates those iconic cracks on the edges. It is a satisfying and fun process for any home cook.
Ingredients You’ll Need
These cookies use simple ingredients you likely already have. Fresh cocoa powder and creamy peanut butter are the stars here.
- 1 1/2 cups all-purpose flour
- 2 tablespoons unsweetened cocoa powder
- 1 teaspoon baking soda
- 1/2 teaspoon salt
- 1/2 cup unsalted butter, softened
- 1/2 cup creamy peanut butter
- 1/2 cup granulated sugar
- 1/2 cup packed light brown sugar
- 1 large egg
- 1 tablespoon milk
- 1 teaspoon vanilla extract
- 1 tablespoon red food coloring
- 1/4 cup granulated sugar for rolling
- 24 milk chocolate kiss candies, unwrapped
Step-by-Step Directions
- Preheat oven to 375°F (190°C) and line baking sheets with parchment paper.
- In a medium bowl, whisk together flour, cocoa powder, baking soda, and salt.
- In a large bowl, cream together butter, peanut butter, 1/2 cup granulated sugar, and brown sugar until light and fluffy.
- Beat in the egg, milk, vanilla extract, and red food coloring until the color is uniform.
- Gradually add the dry ingredients to the wet ingredients, mixing until just combined.
- Shape dough into 1-inch balls and roll each ball in the extra granulated sugar to coat.
- Place balls 2 inches apart on prepared baking sheets.
- Bake for 8 to 10 minutes or until the edges are set.
- Immediately press a chocolate kiss into the center of each cookie allowing the edges to crack slightly.
- Transfer to a wire rack to cool completely so the chocolate resets.
Best Ways to Enjoy It
Serve these cookies warm with a cold glass of milk. They are also delicious alongside a mug of hot cocoa. Set them out on a festive platter for your guests. The bright red color makes them a great centerpiece. You can even gift them in jars for a personal touch.
For a special date night, enjoy them by the fireplace. They are the ultimate comfort food treat for winter. Pair them with a creamy vanilla ice cream for dessert. Your friends will constantly ask you for this recipe. Make sure to save a few for your morning coffee.
How to Store Leftovers
Keep these cookies in an airtight container at room temperature. They will stay fresh and soft for up to five days. You can also freeze the baked cookies for later. Just ensure the chocolate has completely set before stacking them. Use parchment paper between layers to prevent sticking. Reheat for five seconds in the microwave for a melty treat.
If you want to prep ahead, freeze the dough balls. Simply roll them in sugar and freeze on a tray. Then, transfer them to a freezer bag for easy holiday baking. You can bake them straight from the freezer. Just add two extra minutes to the baking time. This makes holiday entertaining much less stressful for you.
Tips for Best Results
- Don’t skip sifting the cocoa powder to avoid bitter lumps.
- Use a cookie scoop for perfectly even sizes every time.
- Avoid overbaking to keep the centers soft and chewy.
- Unwrap the chocolate kisses before the cookies finish baking.
- For the holiday season, try using striped peppermint kisses.
- Press the kiss in immediately while the cookie is hot.
- Let them cool completely so the chocolate stays firm.
- Use gel food coloring for a deeper red hue.
Ways to Switch It Up
- Swap the milk chocolate for dark chocolate kisses.
- Use almond milk and vegan butter for a dairy-free version.
- In summer, use pink food coloring for a garden party.
- Roll the dough in sparkling white sanding sugar.
- Substitute the peanut butter with almond butter for variety.
Common Questions
Can I make the dough ahead of time?
Yes, you can chill the dough for up to two days. Chilling it actually deepens the flavor and prevents spreading. Just let it sit at room temperature for ten minutes before rolling. This makes it much easier to handle.
Why did my cookies crack too much?
Cracking is normal, but too much might mean overbaking. Watch the edges closely and pull them out once set. The residual heat will finish the cooking process. This ensures a perfectly soft texture every time.
Will kids enjoy the cocoa flavor?
Absolutely! The cocoa is subtle and very kid-friendly. It tastes like a mild chocolate cake mixed with peanut butter. It is a winning combination that everyone loves.
I hope these festive cookies bring a little extra joy to your winter evenings. They are so simple to make and truly delicious to share. Happy baking and enjoy every sweet bite!
— Lidia

Ingredients
- 1 1/2 cups all -purpose flour
- 2 tablespoons unsweetened cocoa powder
- 1 teaspoon baking soda
- 1/2 teaspoon sal t
- 1/2 cup unsalted butter, softened
- 1/2 cup creamy peanut butter
- 1/2 cup granulated sugar
- 1/2 cup packed light brown sugar
- 1 large eg g
- 1 tablespoon mil k
- 1 teaspoon vanilla extract
- 1 tablespoon red food coloring
- 1/4 cup granulated sugar for rolling
- 24 milk chocolate kiss candies, unwrapped
Instructions
- Preheat oven to 375°F (190°C) and line baking sheets with parchment paper.
- In a medium bowl, whisk together flour, cocoa powder, baking soda, and salt.
- In a large bowl, cream together butter, peanut butter, 1/2 cup granulated sugar, and brown sugar until light and fluffy.
- Beat in the egg, milk, vanilla extract, and red food coloring until the color is uniform.
- Gradually add the dry ingredients to the wet ingredients, mixing until just combined.
- Shape dough into 1-inch balls and roll each ball in the extra granulated sugar to coat.
- Place balls 2 inches apart on prepared baking sheets.
- Bake for 8 to 10 minutes or until the edges are set.
- Immediately press a chocolate kiss into the center of each cookie allowing the edges to crack slightly.
- Transfer to a wire rack to cool completely so the chocolate resets.