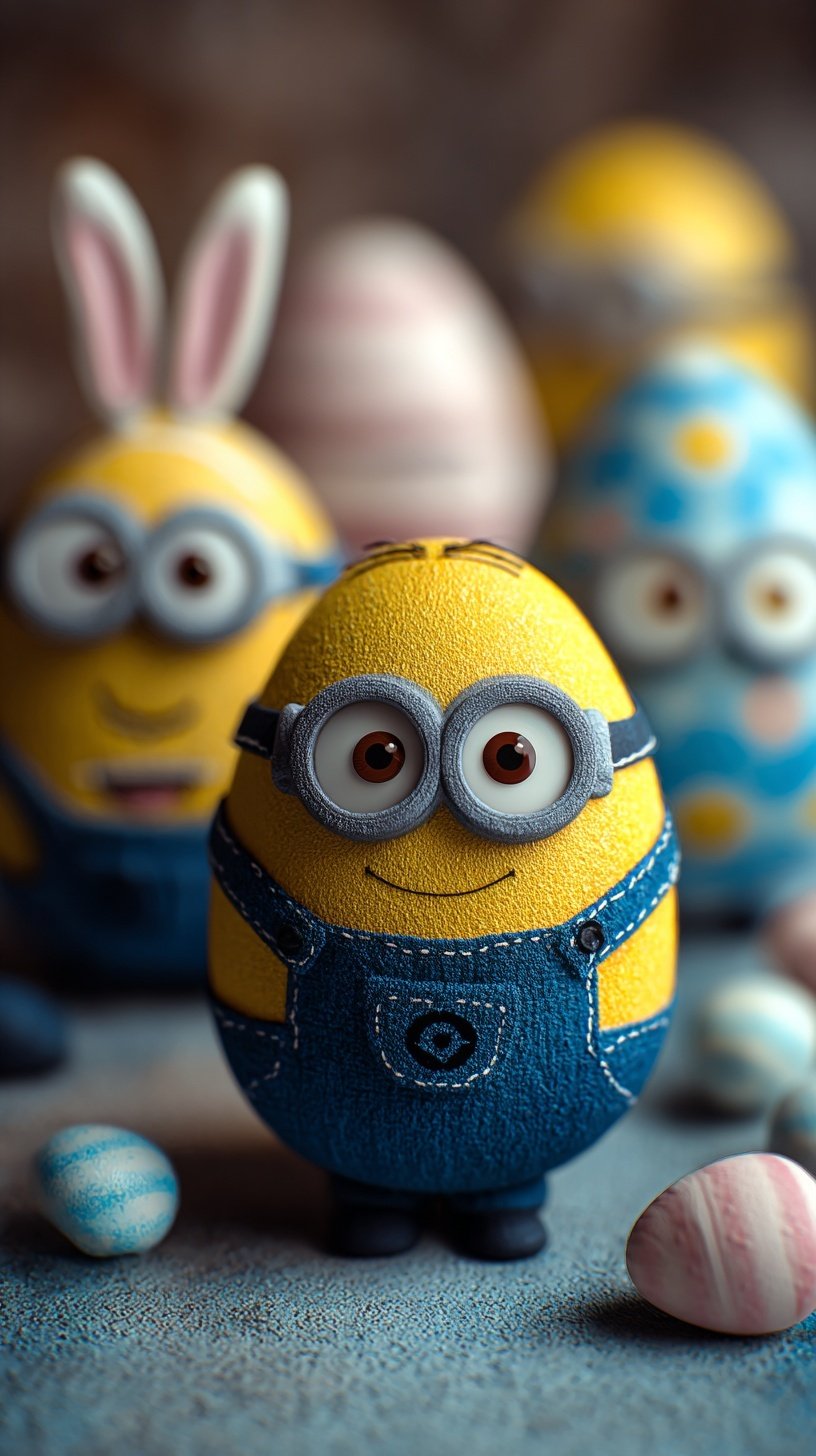
Easter is coming and you need a fun activity for the kids. These Minion Easter Eggs are the perfect way to spend a spring afternoon together. They are bright, silly, and surprisingly simple to make at home.
You only need a few basic supplies to bring these characters to life. This project delivers big smiles with very little mess. Your little ones will love seeing their favorite movie friends on the holiday table this year.
Why This Recipe Is a Winner
Spring is all about fresh starts and fun family traditions. These eggs are a kid-approved project that feels special without being difficult. You likely have most of the supplies in your pantry already.
They make a wonderful centerpiece for your Easter brunch table. The bright colors look beautiful in a basket with green grass. It is a budget-friendly way to decorate for the season together.
Simple Cooking Steps
The process is very straightforward for any beginner cook. You start with perfectly hard-boiled eggs as your base. Then, you use a two-step dipping method for the colors. Even if you aren’t an artist, you can do this easily. The markers and candy eyes do all the hard work for you.
Ingredients You’ll Need
Most of these items are simple pantry staples you probably have on hand. Grab your favorite food colors and let’s get started.
- 6 large eggs
- Yellow liquid food coloring
- Blue liquid food coloring
- 2 teaspoons white vinegar
- 2 cups warm water
- Black edible ink marker
- 12 candy eyes or googly eyes
- Silver metallic marker
Step-by-Step
- Place eggs in a single layer in a saucepan and cover with water. Bring to a boil, then remove from heat and let stand for 12 minutes.
- Transfer eggs to an ice water bath until completely cooled and dry the shells thoroughly.
- Prepare two dye bowls each containing 1 cup warm water, 1 teaspoon vinegar, and 20 drops of food coloring (yellow in one, blue in the other).
- Submerge the top two-thirds of each egg into the yellow dye for 5 minutes until vibrant; let dry completely on a wire rack.
- Carefully dip the bottom third of the dried yellow egg into the blue dye for 3 minutes to create the overalls; let dry completely.
- Draw one or two silver circles in the middle of the yellow section using the silver metallic marker to represent goggle frames.
- Affix the eyes inside the silver frames using a small dab of glue or edible adhesive.
- Use the black marker to draw a mouth, goggle straps extending to the back, and thin hair strands on top.
Best Ways to Enjoy It
Place your finished Minion Easter Eggs in a cute basket with paper grass. They look great next to chocolate bunnies and spring flowers. You can even use them as fun place cards for your holiday dinner.
Set the table, gather the family, and enjoy the holiday together. Your guests will definitely smile when they see these little guys. They are almost too cute to eat!
Keep It Fresh
Store your decorated eggs in the refrigerator for up to one week. Keep them in an egg carton to protect the designs. Do not peel them until you are ready to eat them. If you use non-edible markers, these are just for decoration only. Always ensure your markers are food-safe if you plan to snack on them later.
Tips for Best Results
- Don’t skip the ice bath to ensure easy peeling later.
- Avoid touching the wet dye to prevent messy smudges on the shells.
- Use a wire rack for even drying between the color dips.
- Prepare the dye bowls ahead of time to keep the process moving.
- For Easter morning, make a double batch for the big hunt.
- Ensure the yellow dye is completely dry before dipping into the blue.
- Use a small piece of tape to hold the egg upright while drying.
- Upgrade the look by adding tiny strands of black embroidery thread for hair.
Ways to Switch It Up
- Create “Evil Minions” by using purple dye instead of yellow.
- Mix up the eyes by giving some Minions one eye and others two.
- Use gluten-free candy eyes if you have dietary concerns in the family.
- Swap the silver marker for grey paint if you are only using them for decor.
Common Questions
Can I make these ahead of time?
Yes, you can boil and dye them 24 hours before your event. Just keep them chilled in the fridge until the party starts. This helps save time on busy holiday mornings.
Are these eggs safe to eat?
They are safe if you use food-grade markers and edible adhesive for the eyes. If you use standard craft markers, it is best to use them for decoration only. Always check the labels on your supplies first.
How do I get the colors so bright?
The secret is the vinegar and the soaking time. Let them sit in the dye for the full five minutes for that vibrant yellow look. More food coloring drops will also lead to deeper colors.
I hope these silly little eggs bring a lot of joy to your home this spring. They are such a fun way to celebrate with the people you love. Happy Easter and happy crafting!
— Alex

Ingredients
- 6 large egg s
- Yellow liquid food coloring
- Blue liquid food coloring
- 2 teaspoons white vinegar
- 2 cups warm water
- Black edible ink marker
- 12 candy eyes or googly eyes
- Silver metallic marker
Instructions
- Place eggs in a single layer in a saucepan and cover with water. Bring to a boil, then remove from heat and let stand for 12 minutes.
- Transfer eggs to an ice water bath until completely cooled and dry the shells thoroughly.
- Prepare two dye bowls each containing 1 cup warm water, 1 teaspoon vinegar, and 20 drops of food coloring (yellow in one, blue in the other).
- Submerge the top two-thirds of each egg into the yellow dye for 5 minutes until vibrant; let dry completely on a wire rack.
- Carefully dip the bottom third of the dried yellow egg into the blue dye for 3 minutes to create the overalls; let dry completely.
- Draw one or two silver circles in the middle of the yellow section using the silver metallic marker to represent goggle frames.
- Affix the eyes inside the silver frames using a small dab of glue or edible adhesive.
- Use the black marker to draw a mouth, goggle straps extending to the back, and thin hair strands on top.