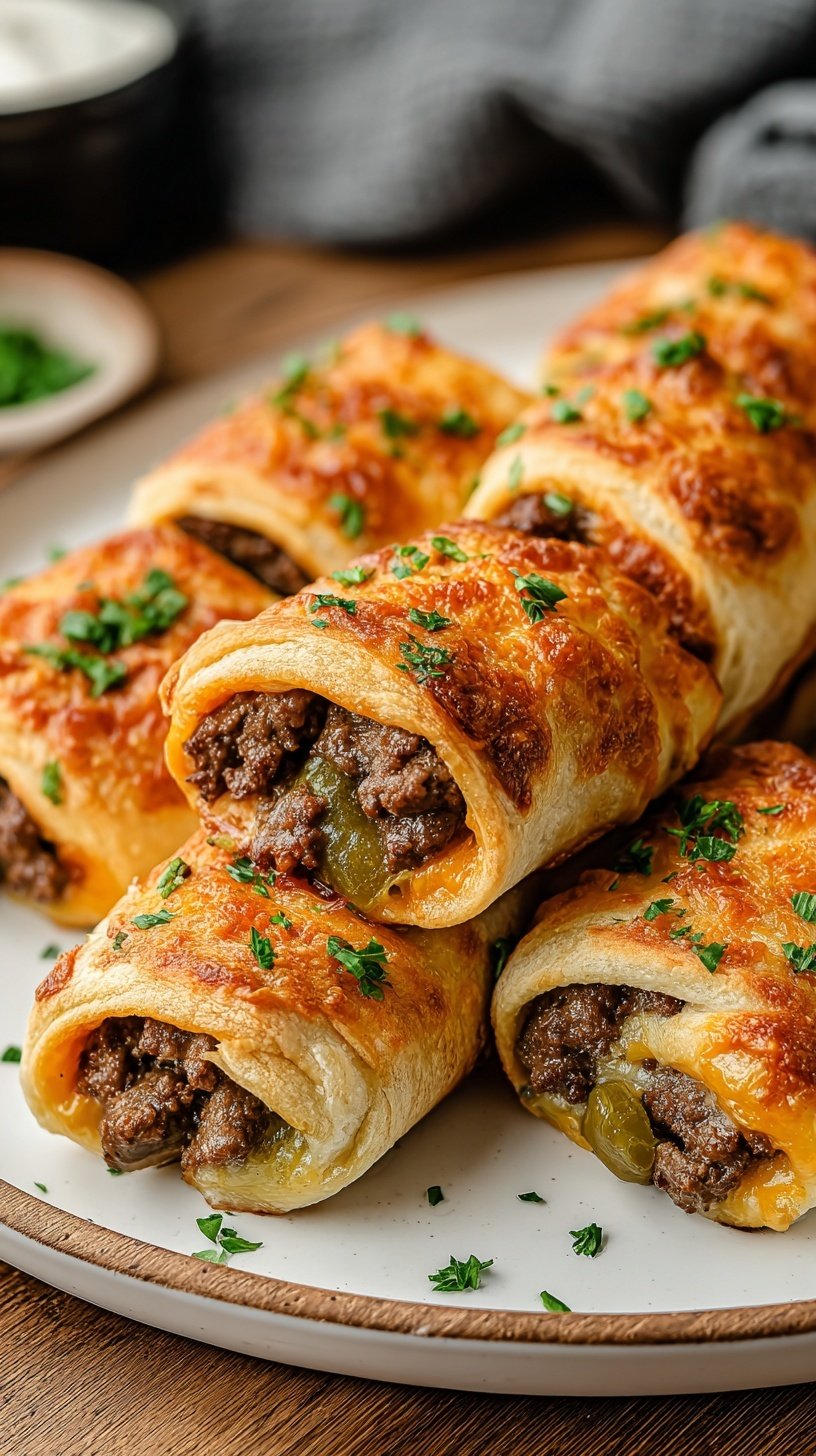
It’s 6pm, you’re tired, and everyone’s hungry. These Keto Philly Cheesesteak roll ups are the perfect solution for your busy night. You get all the savory flavors without the heavy bread. It is a fresh, fast way to handle dinner tonight.
Why This Keto Philly Cheesesteak Is a Winner
This recipe is a winner because it takes only 25 minutes. It fits perfectly into a healthy reset after a busy holiday weekend. Your family will love the gooey cheese and tender beef. It is a low-carb meal that actually feels indulgent and satisfying.
Simple Cooking Method
The process is incredibly simple and stress-free for any home cook. You just sauté the vegetables until they are soft and golden. Then, you roll them up with cheese and deli beef. It is a great way to build confidence in the kitchen quickly. Even beginners can make this look like a restaurant dish.
Simple Ingredients
You likely have most of these items in your kitchen already.
- 12 slices thin-cut deli roast beef (approximately 1 lb)
- 6 slices provolone cheese, halved
- 1 large green bell pepper, julienned
- 1 small yellow onion, thinly sliced
- 1 tablespoon olive oil
- 1 teaspoon garlic powder
- 1 teaspoon Worcestershire sauce
- 1/2 teaspoon sea salt
- 1/4 teaspoon cracked black pepper
Step-by-Step Directions
- Heat olive oil in a large skillet over medium-high heat.
- Add the sliced bell peppers and onions to the skillet. Sauté for 5 to 7 minutes until the vegetables are softened and slightly caramelized.
- Stir in the garlic powder, salt, black pepper, and Worcestershire sauce. Cook for an additional 1 minute, then remove from heat.
- Preheat your oven to 350°F (175°C) or prepare a clean skillet for searing.
- Lay the roast beef slices flat on a clean work surface. If the slices are very thin, double them up for stability.
- Place one half-slice of provolone cheese in the center of each beef slice.
- Distribute the sautéed pepper and onion mixture evenly on top of the cheese across all slices.
- Roll each beef slice tightly around the filling, starting from one end and moving to the other. Secure with a toothpick if necessary.
- Place the roll ups on a parchment-lined baking sheet and bake for 8 to 10 minutes, or until the cheese is thoroughly melted and bubbly.
- Remove from the oven and serve immediately while warm.
Best Ways to Enjoy It
Serve these roll ups while the cheese is still bubbly and warm. They pair beautifully with a crisp, fresh green salad. You can also add a side of roasted cauliflower for more bulk. Set the table and enjoy a stress-free family meal tonight.
Storage & Reheating
Keep your leftovers in an airtight container in the fridge. They will stay fresh for up to three days. Reheat them in a 350°F oven for about 10 minutes. This helps the beef stay tender and the cheese melt. Avoid the microwave to keep the texture at its best.
Tips for Best Results
- Don’t skip the Worcestershire sauce as it adds deep savory flavor.
- Avoid using beef that is sliced too thin or it may tear.
- Substitute pepper jack cheese if you want a little extra kick.
- Sauté the vegetables ahead of time to save minutes during dinner.
- Add a handful of fresh summer herbs for a bright finish.
- Secure the rolls with a toothpick to keep them tight while baking.
Ways to Switch It Up
- Swap the roast beef for thin deli turkey for a lighter version.
- Use dairy-free cheese slices to make this recipe completely paleo-friendly.
- Add sliced mushrooms to the vegetable mix for extra harvest flavor.
Common Questions
Can I make these ahead of time?
Yes, you can roll them up a few hours early. Just keep them covered in the fridge until you are ready. Bake them right before you want to serve dinner.
Will my kids actually eat this?
Most kids love the combination of melted cheese and roast beef. If they dislike peppers, you can leave them out of a few. It is a very kid-friendly way to eat protein.
How do I know when they are done?
The cheese will be melted and starting to bubble around the edges. The beef should look warm and slightly darkened. This usually takes about 8 to 10 minutes in the oven.
I hope these easy roll ups make your weeknight dinner a breeze. They are so satisfying and simple to put together. Happy cooking!
— Alex

Ingredients
- 12 slices thin -cut deli roast beef (approximately 1 lb)
- 6 slices provolone cheese, halved
- 1 large green bell pepper, julienned
- 1 small yellow onion, thinly sliced
- 1 tablespoon olive oil
- 1 teaspoon garlic powder
- 1 teaspoon Worcestershire sauce
- 1/2 teaspoon sea salt
- 1/4 teaspoon cracked black pepper
Instructions
- Heat olive oil in a large skillet over medium-high heat.
- Add the sliced bell peppers and onions to the skillet. Sauté for 5 to 7 minutes until the vegetables are softened and slightly caramelized.
- Stir in the garlic powder, salt, black pepper, and Worcestershire sauce. Cook for an additional 1 minute, then remove from heat.
- Preheat your oven to 350°F (175°C) or prepare a clean skillet for searing.
- Lay the roast beef slices flat on a clean work surface. If the slices are very thin, double them up for stability.
- Place one half-slice of provolone cheese in the center of each beef slice.
- Distribute the sautéed pepper and onion mixture evenly on top of the cheese across all slices.
- Roll each beef slice tightly around the filling, starting from one end and moving to the other. Secure with a toothpick if necessary.
- Place the roll ups on a parchment-lined baking sheet and bake for 8 to 10 minutes, or until the cheese is thoroughly melted and bubbly.
- Remove from the oven and serve immediately while warm.